Verify domains and require SSO
This page is for organization owners and admins who want every member to sign in through the company IdP. You verify your domain, set up login routing and first-login provisioning (JIT), and then turn off email link and Slack logins.
Before you start
Section titled “Before you start”- You need an owner or admin account that can open Settings > Security (
/ws/settings/security) - At least one SSO connection must be active. Without an active connection you cannot require SSO
- You need someone who can add TXT records to your DNS
Work through the steps in this order. The order cannot change.
- Verify the domain
- Set routing domains and first-login provisioning
- Add SSO to your own login methods
- Sign in again with SSO
- Require SSO
1. Verify the domain
Section titled “1. Verify the domain”Domain verification uses DNS to confirm that your organization owns the domain. Until a domain is verified, Actagate does not use it for login routing on the login screen or for first-login provisioning, so finish this step first.
- Open Settings > Security (
/ws/settings/security) and scroll to “Domain verification” under Single sign-on. You see an input field and “Add domain” - Enter the domain (for example
example.com) and press “Add domain”. A row for the domain appears with “Unverified”, the “TXT record name” and the “TXT record value” - Add a TXT record to your DNS. The name is
_actagate-challenge.<domain>and the value isactagate-domain-verification=<token>. Copy both from the screen. Once DNS has the record, anyone can look it up - Wait for DNS to propagate. Then press “Verify” on the domain row. On success the domain shows “Verified”
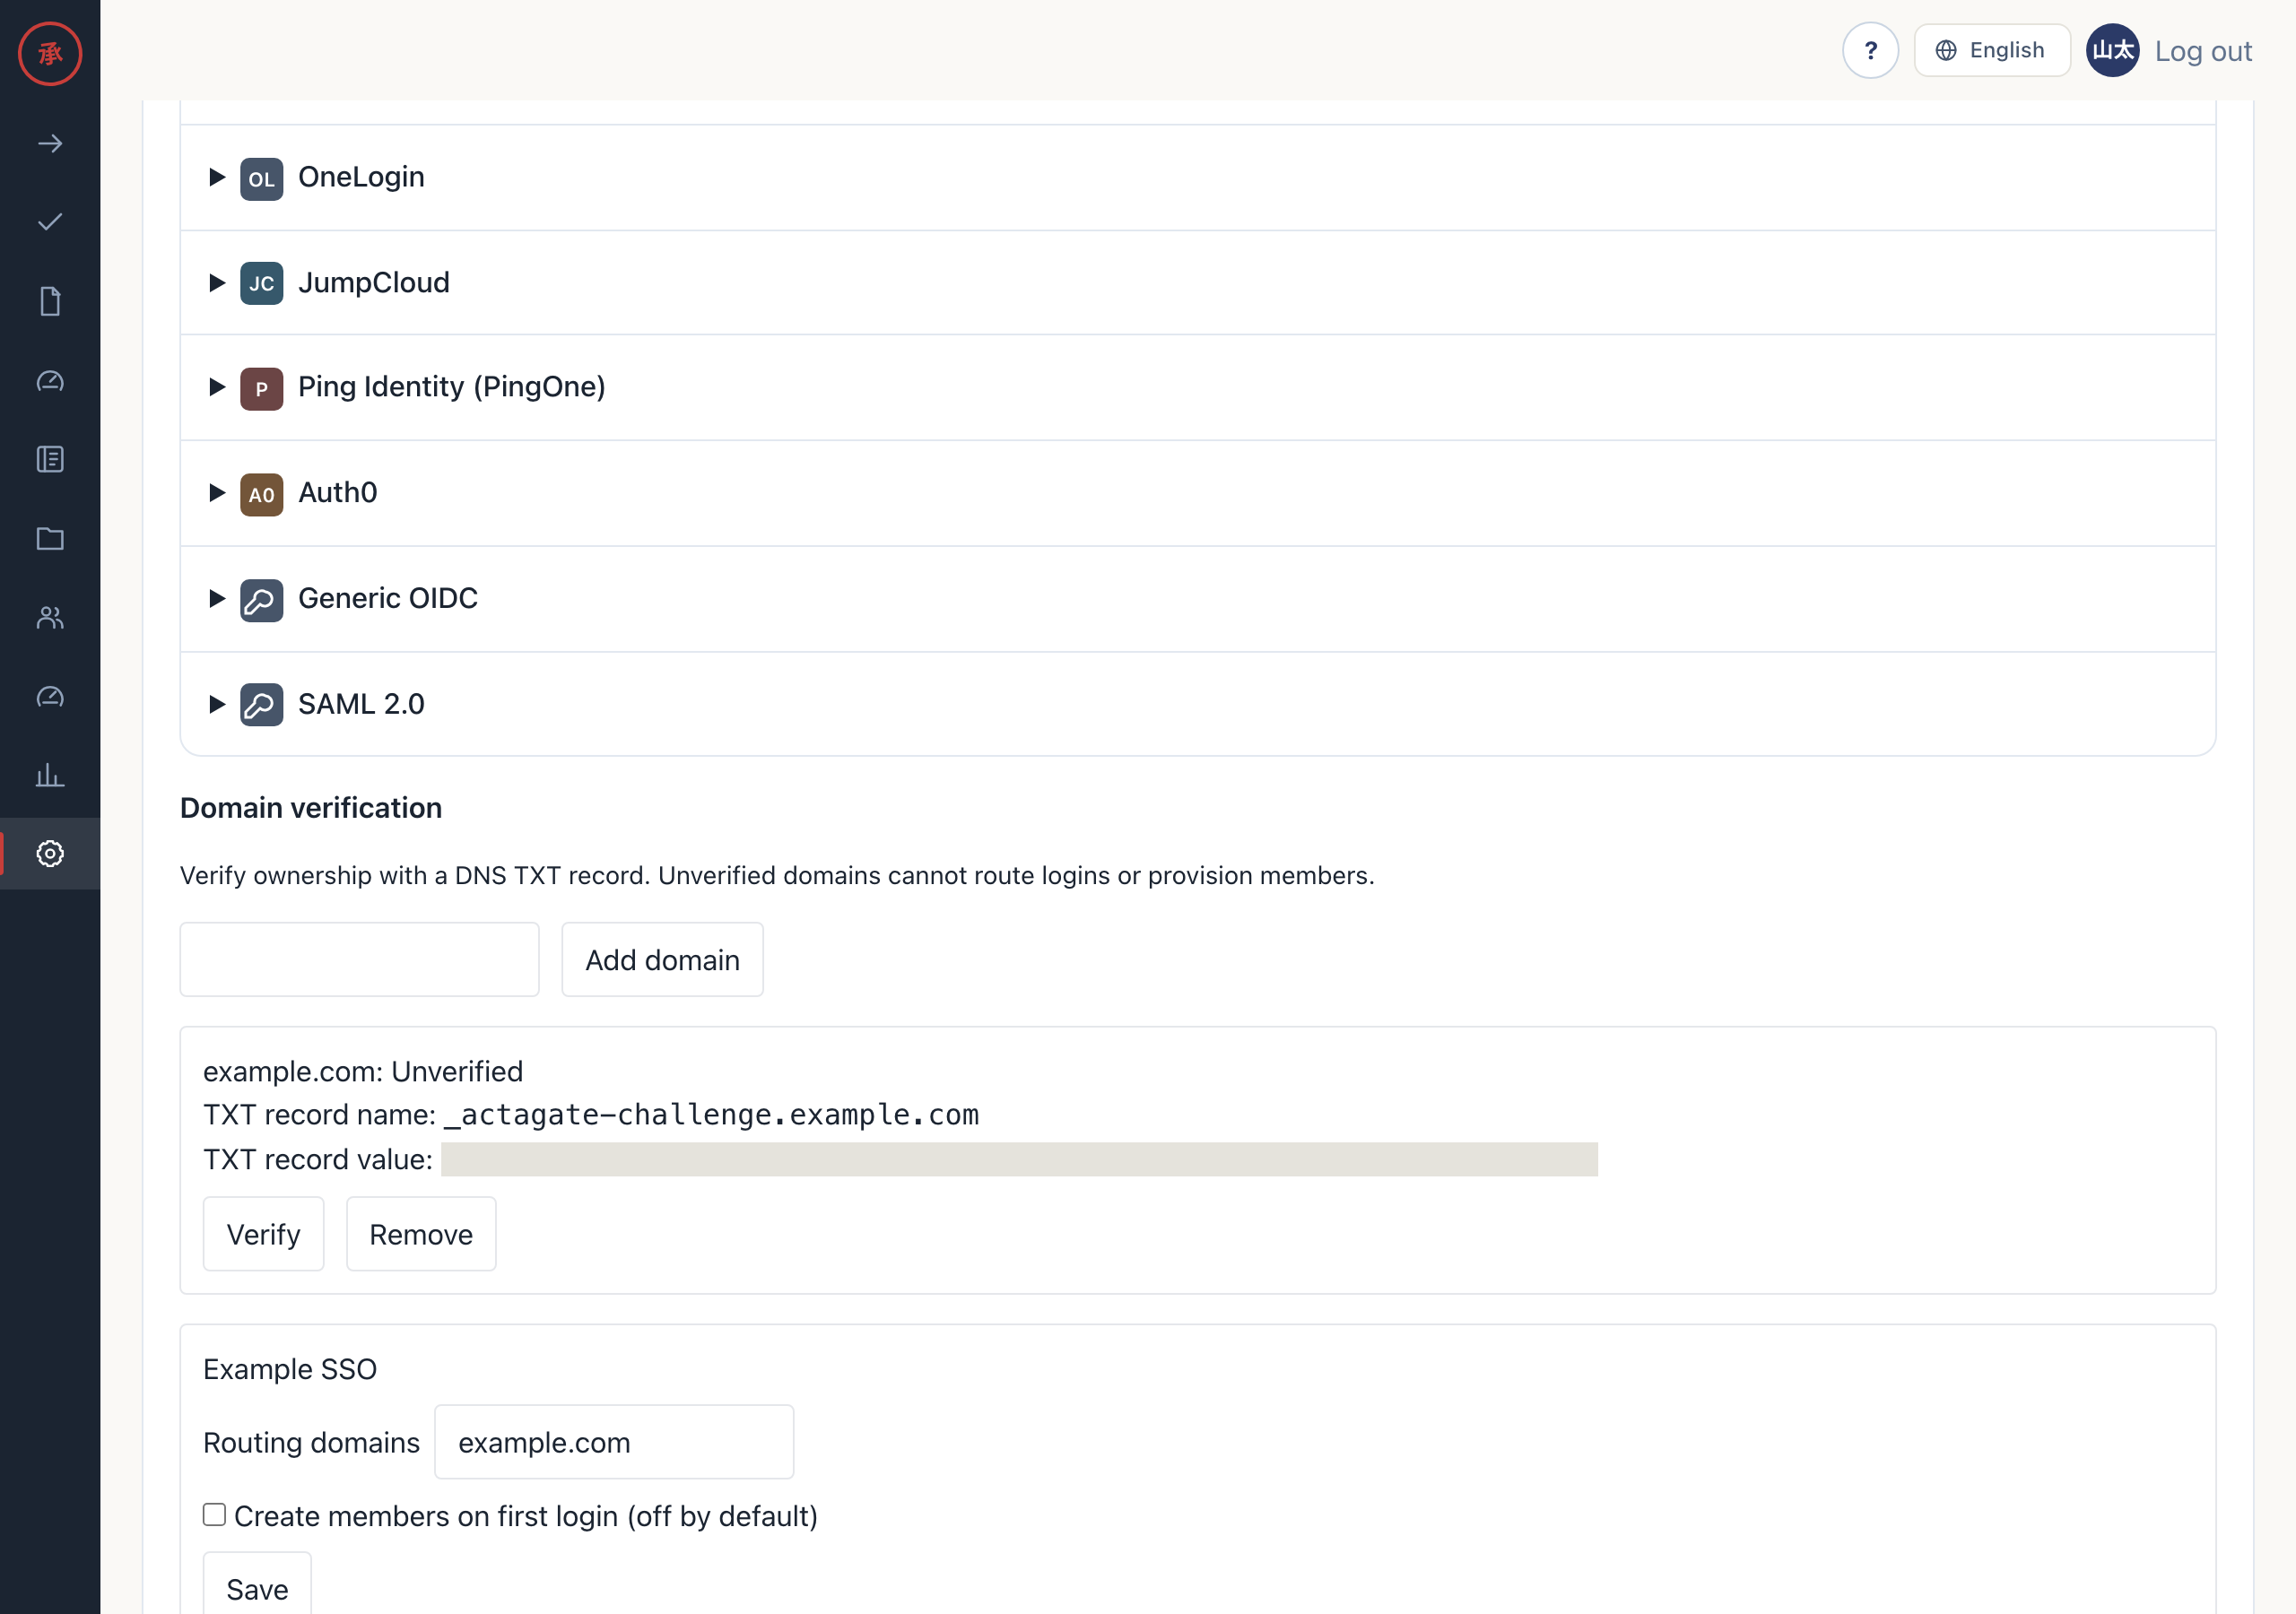
There is one token per organization. However many domains you add, the TXT record value is the same.
DNS is checked only when you press “Verify”. The lookup times out after 5 seconds. A verified domain stays verified even if a later check fails. “Remove” deletes the record, and the domain can no longer be used.
When verification fails
Section titled “When verification fails”The domain row shows the reason. A domain you have not verified yet stays “Unverified”.
| Message | Cause and fix |
|---|---|
| TXT record not found. | There is no TXT record at _actagate-challenge.<domain>. Check the name, wait for DNS to propagate, then press “Verify” again |
| The TXT record value does not match. | The TXT record value differs from the one on screen. Paste the value again |
| DNS verification failed. Try again later. | The DNS lookup timed out or failed. Wait a while and press “Verify” again |
| Another organization has verified this domain. | Only one organization can have a given domain verified |
| Check the domain format. | The domain is malformed. Enter it without https://, @ or a trailing dot |
2. Set routing domains and first-login provisioning
Section titled “2. Set routing domains and first-login provisioning”Below “Domain verification” there is a settings block for each connection.
- In “Routing domains” for the connection, enter the email domains of the people who use that IdP. Separate several domains with commas or spaces
- To create accounts for people you have not invited when they first sign in, check “Create members on first login (off by default)”. It is unchecked by default
- Press “Save”. You return to the same screen
Routing applies to people who enter their email address on the login screen and press “Continue”. If the email domain is one of the routing domains of an active connection, and the domain is verified in this organization, the person goes to that connection’s IdP. If you give the same domain to two or more active connections, neither one gets the routing. Those people continue with email login instead.
First-login provisioning (JIT) creates an account only when all of these are true. The new account always has the member role. You can change the role under Members.
- “Create members on first login (off by default)” is checked for the connection
- The IdP returns the email address as verified
- The email domain is one of the connection’s routing domains and is verified in this organization
- No member has that email address yet
Existing members are not created again. If a member already has the same email address, the IdP account is linked to that member instead. Owners and admins are never linked automatically. They link themselves in step 3.
3. Add SSO to your own login methods
Section titled “3. Add SSO to your own login methods”Owners and admins are not linked automatically on their first SSO login. This holds even when the IdP account has the same email address. The login screen shows “To add an administrator login method, sign in with an existing method first.” Whoever turns on the requirement adds SSO to their own account first.
- Sign in as usual with an email link or Slack
- Open Settings (
/ws/settings) and press “Add” under “Login methods”. The IdP sign-in page opens - Sign in to the IdP. You return to Settings and see “Login method added.” The connection name and “Remove” now appear under “Login methods”
You cannot require SSO yet. Adding a login method leaves your current session as it was when you signed in with email or Slack, and that session does not count as an SSO login.
4. Sign in again with SSO
Section titled “4. Sign in again with SSO”- Press “Log out” at the top right. You return to the login screen
- On the login screen, press “Continue with
”, or enter your email address and press “Continue”. The IdP sign-in page opens - Sign in to the IdP. The home page opens
5. Require SSO
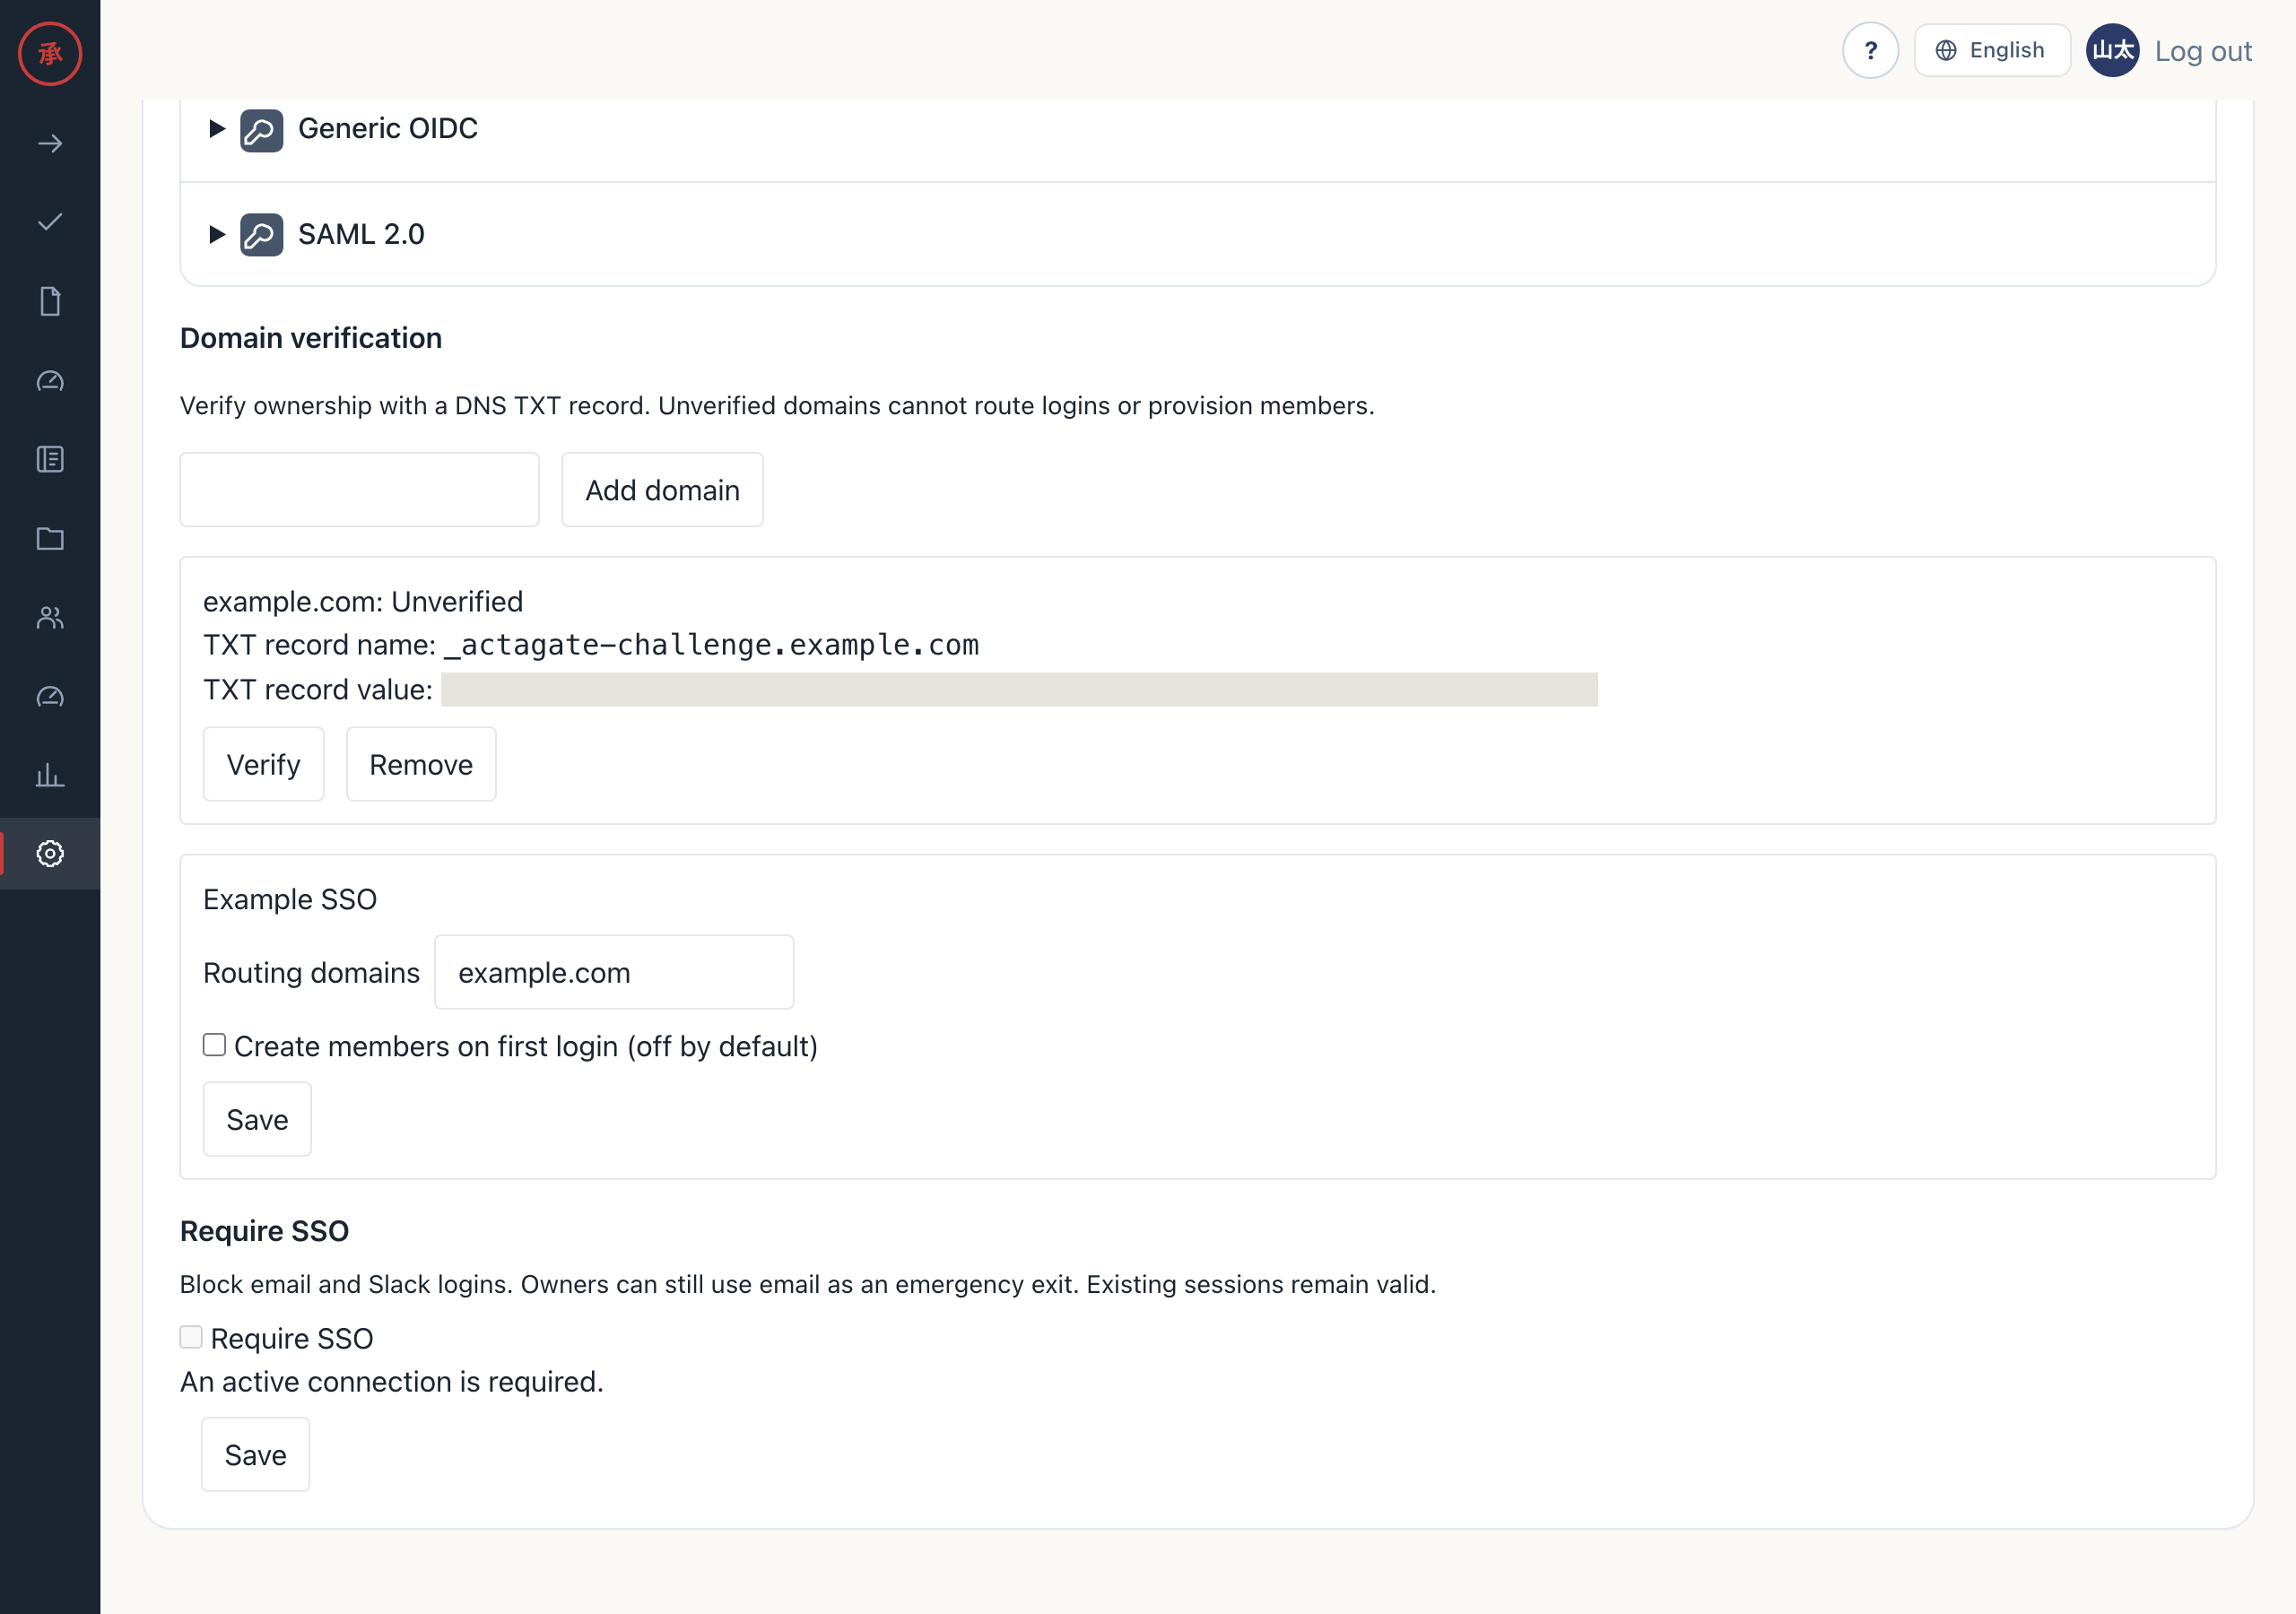
Section titled “5. Require SSO”You can require SSO only when both conditions below are met. Otherwise the “Require SSO” checkbox and “Save” are disabled and the reason is shown.
| Message | Condition not met |
|---|---|
| An active connection is required. | There is no active SSO connection |
| Sign in through an active SSO connection first. | Your current session did not come from an SSO login through an active connection |
A connection test or an added login method is not enough. As in step 4, log out, sign in again through the IdP of an active connection, and do this step from that session.
- Open Settings > Security (
/ws/settings/security) and scroll to “Require SSO”. The checkbox is enabled - Check “Require SSO” and press “Save”. You return to the same screen with the box still checked
What changes when SSO is required
Section titled “What changes when SSO is required”Which login methods work depends on the role.
| Login method | Owner (owner) |
Any other role |
|---|---|---|
| SSO | Allowed | Allowed |
| Email link | Allowed (emergency exit) | Rejected |
| Slack login | Rejected | Rejected |
- A rejected login shows “Sign in with SSO for this organization.” on the login screen
- Actagate sends no login emails to anyone except owners. Invitations still arrive, but their link only opens the login screen
- The owner’s email link is the emergency exit for an IdP outage or a misconfiguration. Sign in with it to turn the requirement off
- Existing sessions stay valid. People who signed in with email or Slack before you turned on the requirement keep working until that session ends
What you cannot do while SSO is required
Section titled “What you cannot do while SSO is required”You cannot disable the last active connection. Pressing “Disable” shows “Turn off SSO enforcement before disabling the last active connection.” Changing authentication settings in a way that would return the last active connection to draft is rejected with the same message.
Turn the requirement off first. If another connection is also active, you can disable one of them without turning the requirement off.
Turn off the SSO requirement
Section titled “Turn off the SSO requirement”- Open Settings > Security (
/ws/settings/security). If you cannot sign in to the IdP, an owner signs in with an email link - Uncheck “Require SSO” and press “Save”. You return to the same screen with the box unchecked. The change takes effect at once, and email link and Slack logins work again for every role
You do not need to sign in with SSO again.
Audit log entries
Section titled “Audit log entries”| Action | Audit event |
|---|---|
| Add or remove a domain | sso.domain_added, sso.domain_removed |
| Check a domain (success or failure) | sso.domain_verified (with the result) |
| Change routing domains or first-login provisioning | sso.connection_updated |
| Create an account by first-login provisioning | sso.user_provisioned |
| Require SSO or turn it off | sso.enforced, sso.unenforced |
| Owner email login while SSO is required | auth.login and sso.owner_bypass |
| Email link rejected while SSO is required | auth.failed (reason is sso_required) |
The token is not recorded.